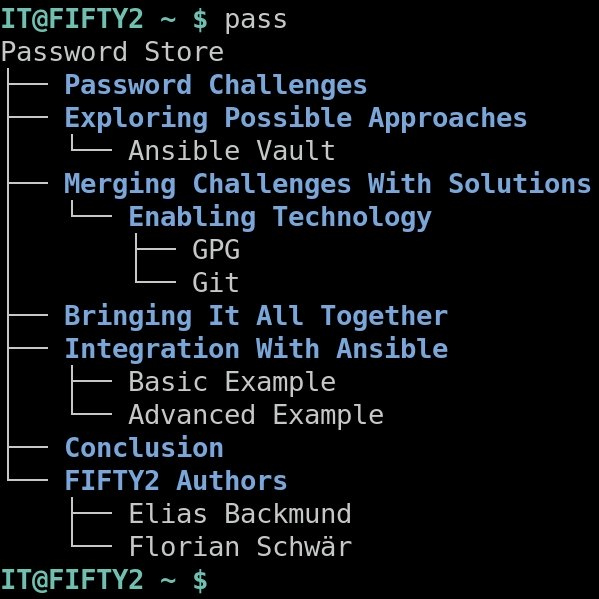
How we provide I.T. secrets through password-store in Ansible at FIFTY2

June 30, 2022
Elias Backmund and Florian Schwär

We at FIFTY2 configure and maintain a few dozen physical and virtualized servers for our developers and application engineers, so they have a solid, basic infrastructure to develop, test and simulate on.

Getting everyone to remember one single password for everything is easy, but certainly not a best practice in operational security. Also, writing down every password in a shared spreadsheet still feels kind of wrong, but leads into the right direction. There are plenty of available password managers to choose from, be it online as a service, offline, shared with other people, or just integrated into the browser you are using right now to read this text.

Chosing one of them is no big deal, but what if it comes to automatically accessing those machines that we set up, with passwords that are stored somewhere in a password manager? And how can we gain access to a server when physically standing in front of it, in case a disaster hits the fan? How can different people stay on top of all passwords configured, without reusing a password, ever? And, once we overcome those challenges, what other handy things can we do with such a system?

None of those challenges are new or extremely hard to solve problems, but getting them set up initially and making them work smoothly can have some bumps down the road.

In this article, we show how we are using password-store to manage various credentials for multiple systems, how we set it up to couple it with the Ansible automation platform. In case you are interested in trying this out yourself, there should be enough code snippets to get you up and running in no time.

Share:

Password Challenges

When our infrastructure started expanding to more and more nodes, we decided that we had to somehow make sure everyone involved in the maintainance of those machines retained access. With a growing number of people involved in the operations-part of our IT, it became clear we had to somehow manage all those credentials to keep an overview. Putting them into our version control system in plain-text was certainly not an option.

We also agreed that using the same passwords over and over again on multiple machines was nothing we wanted to seriously get started with. Having also decided that we would love to use Ansible for installation, configuration and maintenance tasks on our infrastructure, it had to be somehow coupled with our wish of unique passwords.

In hindsight a tool is only as good as it grows with your evolving requirements over time. So we took some time to find the tool that would best fit our wishes. Some things we considered besides the above points were, for example, we didn’t want to be cloud- or third-party dependent. These passwords, and our infrastructure secrets in general, should be accessible and manipulable for us at all times, no matter what any hosted service or even our internet connection decided to do. Also, being able to track changes made to passwords should be at least documented, and be reversable. This would also imply we could do automated password rollovers where needed, and be able to access passwords in an automated way in general.

Having the possibility to give access to different groups of people in the company, or even outside of it, was a key feature when planning (but became less of a requirement while implementing and using it later). A typical usecase would be to give somebody access to certain information, like login passwords, but not the backup encryption keys for the same machine.

Exploring Possible Approaches

As discussed above already, re-using passwords across a multitude of machines was not an option for us, and having leaked this single, holy, password, would have tremendous impact on the integrity and security of all machines affected – even more so if a password would get spread so wide that one can’t keep an overview of where else it could have been used. It would also be a rather bad point in time to think about a proper password policy in the moment that one password goes missing.

It was also not an option to re-use parts of a password and append machine-specific details to it, like mypassword-machine1, mypassword-weblogin, mypassword-machine23, … It would be rather deterministic though and therefore easy to automate, but only making the whole solution crappy as hell. So we had to come up with truly random passwords either way.

Ansible Vault

We looked into using Ansible Vault, a built-in secrets manager in Ansible. It stores secrets in an encrypted file right next to your other files, and makes them accessible when you supply the correct key to open them. This key would have been a shared password again, which did not fit best what we had thought of. In fairness though, Ansible Vault is a great, built-in tool for managing passwords or any other structured data in Ansible.

There are plenty of possibilities to retrieve a secret in Ansible, and after skimming through some of them, we decided to give passwordstore a try. It has a native lookup plugin in Ansible and supports a wide range of systems and usecases. Spoiler: We sticked with it and it works perfectly fine. Although, due to its tight coupling with GPG, it has a rather steep learning curve and needs a lot of initial setup (in comparison to day-to-day usage). We will come back to this in the following paragaphs.

Enabling Technology

This section outlines the building blocks used by passwordstore. If you have used the gpg and git commands before and are familiar with its concepts, you can as well skip this section.

GPG

In GPG you have a key consisting of two parts, a private key and a public key, represented by two different files on your computer, or – for illustration purposes – represent a padlock and its keys. It is also called a key pair. They get used for all operations you could use a key or a lock for, like in the real world. Your public key works like an infinite amount of open padlocks with your name on it, that you can hand out to people or just have laying around for someone to discover and pick up.

Since it has your name on it, people will reckon that it is yours. Also since everyone could just go out and distribute padlocks with any name on it, the finder should always reconnect with the purported owner to verify it is indeed one of their padlocks. Otherwise, the owner will not have the correct key to open that padlock, although it got the correct name on it.

In order to encrypt data – or lock a treasure chest – for somebody, one would use this person’s open padlock and apply it to the treasure in question. They could as well use padlocks of multiple people for the same treasure chest. Note that, as opposed to the real world, with GPG keys it is enough to have a key to one of the public keys (padlocks) on that chest in order to open it. Everyone can open the chest by themselves, without the need of the others having to provide their key to their lock. When encrypting something, each person’s key is called a receipient in GPG.

The key to the padlock, in turn, is used to open it. It can only open this one specific lock, and it is made unsurmountable hard (by math) to create a fitting key by just looking at a padlock (public key). The other way around though, it is by design made possible to craft a new, identical, padlock out of the key with very low effort. You could say the padlock is formed around the shape of the key, without giving away the key’s very own shape.

The key can also be used to create so-called signatures, with which (using the padlock analogy) you prove to someone else that you are indeed in possession of the key to your specific padlock. Think of it as you would show somebody that you can unlock your locked padlock before giving it to them. (For completeness, this does not solve the problem of a rougue actor distributing padlocks in your name). This way they know that you (and only you) are able to open the secret chest they intend to lock for you. It also implies that a secret key is kept private at all times.

Git

Git is a version control system (VCS), which makes it easy to work on text files (among other things), without getting entangled with other people’s parallel work on the same file. You can think of it like a shared document where everyone is contributing at the same time. When editing the same file and line, let’s say, Git will keep both editor’s lines intact and makes it easy to decide in a later step which line to keep, in case of a conflict. On top of that, every edit ever made to each file is kept in history, including information about who made the edit and when, plus an optional comment about the change (called a commit in Git).

It does not have to be used by multiple persons at the same time, though, and can be used to just keep track of changes. Image working on a lengthy document in your favourite word processing software. You are about to rephrase a major paragraph, but before you do so you create a copy of the current document, just in case you want to go back to your previous wording.

And tada, a few edits down the line you have a folder full of files named document.txt, document-1.txt, document-final-v3.txt and so on. Not with Git though, where you’d also create and use different versions of a file, but always within one view onto all files (called a branch in Git). You can switch between those different branches, and edit them concurrently without losing another branch’s progress. If you are done with the edit on one branch, you can decide to include it into your other branch, where you include all changes and pick which wording to use in case you edited the same sentence twice, in different ways.

In Git, files, their versions and their whole history are stored in so-called repositories, which can be shared between multiple people (e.g. over the internet) to enable collaborative, distributed editing.

If you are more interested in how we use Git to develop our software PreonLab, you can read on about Continuous Integration in our Innovation Corner: How to develop reliable software (fast).

Bringing It All Together

Each person at FIFTY2 which requires access to one or more passwords in our passwordstore will need to have a GPG key pair. There are many tutorials online on how to create such keypair. The key does not have any special requirements and is created in a few clicks and clacks. Each one’s key is then added to the Git repository, where someone (who can already decrypt each password) can recreate the secrets to include that person’s key.

Since all changes to the password files are tracked in Git, it is easy to retrieve changes made by other people, like adding passwords or changing them. The files are protected on disk by the GPG encryption, so that it is no concern uploading them to a (even public) Git repository. It also makes it easy to track scenarios of “who had access to which password at what point”, or who gave access to what, changed a password, etc. Passwords can virtually not get lost in Git, too: in case an encrypted file got deleted, it can just be recovered from the Git history.

With all positive aspects aside, one problem should not be overlooked, namely withdrawing access to an encrypted file on purpose, or what to do if one of the keys gets compromised, and a potential attacker has access to encrypted passwords. With every revocation of access to a file, it must first get re-encrypted (leaving out the withdrawn or compromised key), and must then change the content of the file(s) (the password itself). Otherwise, the holder of that withdrawn or compromised key could still access the valid password through the Git history.

For illustration, this is what PreonLab would look like as encrypted secret when accessed without having a key for it:

-----BEGIN PGP MESSAGE-----

hF4Dfo0XTteyZ/MSAQdAlBrn9hX8rnQ03mBdbz9RK5nkys2T6dVQ8tm6/XDjWy0w
TRMYvxtpBkgpuJD+6PBhdyrX6rc1VNliUDMWPvzPlw1H5f030laGSiPJf3wDcyry
0kIBjjsjeFI/mGN1XCYwuXGcVOLsmW/IusfX/00IzobT/SsK7Vqw8DvRCMqFbdyi
EixjDq8rQM9HyrMzyY6SBWYA+mg=
=AdSG
-----END PGP MESSAGE-----

Although the content of a file is being encrypted, the filename itself is not. It is not advisable to put the password or hints to it into the filename. With the help of GPG’s features, it is furthermore possible to define receipients on a per-folder basis. This way, different areas of concern or different levels of “security clearance” can be achieved through multiple sets of folders and subfolders.

With a growing number of participants involved, it gets more and more important to keep all keys up to date for everyone, and the passwordstore operationally. Primarily, this means that new keys should be announced and made available for everyone. The biggest obstacle here is to provide all keys in an easy to notice and consumable fashion, since each participant needs every key in their personal list of available keys – otherwise encryption won’t work. Importing keys is each one’s personal duty, since it means updating their personal list of known GPG keys. It is also important in GPG to mark each one of those keys as “trusted”. We made this as frictionless as we think is possible so far, with bundled GPG keyrings and ready-to-apply ownertrust files:

gpg --import fifty2-keyring.kbx
gpg --import-ownertrust otrust.txt

This not only is true for new keys, but also for soon-to-be-expired keys. The same steps apply to those keys, since they change in structure (a new expiry date and signature is added), so they must be uploaded and added by each participant again.

Integration With Ansible

Now let’s come to the details of how to get secrets from the passwordstore into Ansible.

We will start with a basic example of how to read a password from the passwordstore and just print it. The second, advanced example will go more into detail of how to use host-specific passwords based on which hostname is targeted, and what pitfalls are awaiting us.

Basic Example

As soon as you have a working passwordstore installation, you can just use the Ansible passwordstore lookup plugin to retrieve any secret the same way you would use a normal variable in Ansible. The following example prints out a password stored in the passwordstore in database/admin:

  • ansible/inventory.yml
---
all:
  hosts:
    serverdebian.prod.fifty2.eu:


  • ansible/playbook1.yml
---
- hosts: all
  gather_facts: false
  tasks:
    - name: Print content of passwordstore entry
      debug:
        msg: "{{ lookup('passwordstore', 'database/admin') }}"


  • Running the playbook1.yml
(venv) $ ansible-playbook -i inventory playbook1.yml

PLAY [all] ******************************************************

TASK [Print content of passwordstore entry] *********************
ok: [serverdebian.prod.fifty2.eu] => {
    "msg": "mysupersecuredatabaseadminpassword"}

PLAY RECAP ******************************************************
serverdebian.prod.fifty2.eu : ok=1    changed=0    unreachable=0
  failed=0    skipped=0    rescued=0    ignored=0

We can also use variables to craft the lookup path during runtime:


  • ansible/playbook2.yml
---
- hosts: all

  tasks:
    - name: Print passwords for all existing users
      debug:
        msg: "{{ lookup('passwordstore', 'logins/myhost/' + item) }}"
      loop:
        - root
        - fred
        - hans

    - name: Create passwords for missing users
      debug:
        msg: "{{ lookup('passwordstore', \
            'logins/myhost/' + item + ' create=true') }}"
      loop:
        - karl-otto
        - juergen


  • Running the playbook2.yml:
(venv) $ ansible-playbook -i inventory playbook2.yml

PLAY [all] ******************************************************

TASK [Print passwords for all existing users] *******************
ok: [serverdebian.prod.fifty2.eu] => (item=root) => {
    "msg": "RAs8u6Rk"
}
ok: [serverdebian.prod.fifty2.eu] => (item=fred) => {
    "msg": "AEpxrPUK"
}
ok: [serverdebian.prod.fifty2.eu] => (item=hans) => {
    "msg": "eNljpMxG"
}

TASK [Create passwords for missing users] ***********************
ok: [serverdebian.prod.fifty2.eu] => (item=karl-otto) => {
    "msg": "pa1uuvf9wg,E5loW"
}
ok: [serverdebian.prod.fifty2.eu] => (item=juergen) => {
    "msg": "JQJ5bDhLH492iXtA"
}

PLAY RECAP ******************************************************
serverdebian.prod.fifty2.eu : ok=2    changed=0    unreachable=0
  failed=0    skipped=0    rescued=0    ignored=0

The Ansible passwordstore lookup makes it easy to store user passwords, configuration secrets and more in a secure but easily accessible place. It is stored encrypted by default and can be managed independently of your Ansible code.


Advanced Example

In this example, we will configure host-specific login credentials. System logins are stored in IT/system_logins/<hostname>. Missing passwords are not created by default, which means passwords must be pre-seeded into the passwordstore before Ansible can run. This is manual work for new hosts as of writing this and has room for improvement.


  • ansible/inventory.yml
---
all:
  hosts:
    serverdebian.prod.fifty2.eu:
    clientrocky.prod.fifty2.eu:


  • ansible/group_vars/all.yml
---
### If not specified explicitly in an inventory file or host_vars,
### connect as user 'debian'
ansible_user: debian

### Get login credentials from password-store
ansible_password: "{{ lookup('passwordstore', \
        'IT/system_logins/' + inventory_hostname + '/' + ansible_user) }}"
ansible_become_password: "{{ lookup('passwordstore', \
        'IT/system_logins/' + inventory_hostname + '/' + ansible_user) }}"


  • ansible/host_vars/clientrocky.prod.fifty2.eu.yml
---
ansible_user: rocky
  • ansible/playbook3.yml
---
- hosts: all
  gather_facts: true
  tasks:
    - name: Install a package with elevated privileges
      package:
        name: git
        state: present
      become: true


  • Running playbook3.yml:
(venv) $ ansible-playbook -i inventory playbook3.yml
PLAY [all] ******************************************************
TASK [Gathering Facts] ******************************************
ok: [serverdebian.prod.fifty2.eu]
ok: [clientrocky.prod.fifty2.eu]
TASK [Install a package with elevated privileges] ***************
changed: [serverdebian.prod.fifty2.eu]
changed: [clientrocky.prod.fifty2.eu]
PLAY RECAP ******************************************************
serverdebian.prod.fifty2.eu : ok=1    changed=1    unreachable=0
  failed=0    skipped=0    rescued=0    ignored=0
clientrocky.prod.fifty2.eu  : ok=1    changed=1    unreachable=0
  failed=0    skipped=0    rescued=0    ignored=0

So far, so good, but this setup has its quirks. For example, the lookup plugin always does a lookup, no matter if a password is required or not, and it fails execution if there was none found. This lets tasks and whole playbooks fail in certain cases when doing a delegate_to to a different host. As said, the passwords are looked up (but not used in case SSH keys are available), and the passwordstore plugin returns an error in case the password could not be found.

Imagine the above setup, but this time we run a task with delegate_to in a different playbook. The example task below will read a client’s login credentials from the passwordstore and configure a server with it:


  • ansible/playbook4.yml
---
- hosts: clientrocky.prod.fifty2.eu
  gather_facts: true

  tasks:
    - name: Allow login of client onto server via htpasswd
      htpasswd:
        path: /server/path/to/client/login/credentials/.htpasswd
        name: "{{ inventory_hostname_short }}"
        password: "{{ lookup('passwordstore', \
            'IT/client_credentials/' + inventory_hostname) }}"
        state: present
      delegate_to: serverdebian.prod.fifty2.eu


  • Running playbook4.yml: (lines wrapped for readability)
(venv) $ ansible-playbook -i inventory playbook4.yml

PLAY [clientrocky.prod.fifty2.eu] *******************************

TASK [Gathering Facts] ******************************************
ok: [clientrocky.prod.fifty2.eu]

TASK [Allow login of client onto server via htpasswd] ***********
fatal: [clientrocky.prod.fifty2.eu -> serverdebian.prod.fifty2.eu]: FAILED!
=> {"msg": "An unhandled exception occurred while running the lookup
plugin 'passwordstore'. Error was a <class 'ansible.errors.AnsibleError'>,
original message: passwordstore:
passname IT/system_logins/clientrocky.prod.fifty2.eu/debian not found
and missing=error is set. passwordstore:
passname IT/system_logins/clientrocky.prod.fifty2.eu/debian not found
and missing=error is set"}

PLAY RECAP ******************************************************
clientrocky.prod.fifty2.eu : ok=1    changed=0    unreachable=0
  failed=1    skipped=0    rescued=0    ignored=0

Strange, right? Ansible failed due to a password we didn’t request to be used, and which does not exist.

This happens because Ansible re-reads group_vars/all.yml, since the delegate_to-host serverdebian.prod.fifty2.eu is in this group as well, but it does not read the delegating host’s variables in host_vars/clientrocky.prod.fifty2.eu.yml again. It does, however, read the delegated-to-host’s host_vars/serverdebian.prod.fifty2.eu.yml variables file. Therefore, the ansible_user variable will be set to the default value specified in group_vars/all.yml again, which leads to the above, non-existing password path.

This also happens with delegate_to: localhost in the same way, which is why you should explicitly set some non-ambiguous variables there if you intend to use this exact setup:


  • host_vars/localhost.yml:
ansible_password: ""
ansible_become_password: ""

To prevent the above error from happening, you could split off those delegate_to tasks into a separate playbook, but this might not always be the preferred method or even not possible if you require certain variables coming from the delegating host. Instead, it is possible to specify task vars, which rank rather high in the Ansible variable precedence. Also, by specifying ansible_host instead of inventory_hostname in those task vars, the correct hostname will automatically be used for this scenario (see here under “Note”).

Our correctly working task looks like this then:


  • ansible/playbook4.yml:
---
- hosts: clientrocky.prod.fifty2.eu
  gather_facts: true

  tasks:
    - name: Allow login of client onto server via htpasswd
      htpasswd:
        path: /server/path/to/client/login/credentials/.htpasswd
        name: "{{ inventory_hostname_short }}"
        password: "{{ lookup('passwordstore', \
            'IT/client_credentials/' + inventory_hostname) }}"
        state: present
      delegate_to: serverdebian.prod.fifty2.eu
      vars:
        ansible_password: "{{ lookup('passwordstore', \
            'IT/system_logins/' + ansible_hostname + '/' + ansible_user) }}"
        ansible_become_password: "{{ lookup('passwordstore', \
            'IT/system_logins/' + ansible_hostname + '/' + ansible_user) }}"

…and the output would indicate a correctly running task:

(venv) $ ansible-playbook -i inventory playbook4.yml

PLAY [clientrocky.prod.fifty2.eu] *******************************

TASK [Gathering Facts] ******************************************
ok: [clientrocky.prod.fifty2.eu]

TASK [Allow login of client onto server via htpasswd] ***********
changed: [clientrocky.prod.fifty2.eu -> serverdebian.prod.fifty2.eu]

PLAY RECAP ******************************************************
clientrocky.prod.fifty2.eu : ok=2    changed=1    unreachable=0
  failed=0    skipped=0    rescued=0    ignored=0

Conclusion

The passwordstore might have a steep learning curve if you never used its GPG building blocks before, but it makes it a very powerful and versatile tool to manage passwords or any form of sensitive data. Accessing passwords with a lookup through the passwordstore in Ansible makes it a no-brainer to keep those credentials organized. It has its own (manageable) issues though, as we saw in the advanced example.

With an operational setup like this, it is little to no effort to store every secret used by Ansible in the passwordstore, for example machine-dependent backup encryption keys that should survive a server’s complete rebuild. Further, it is feasible to give automation systems such as Continuous Integration (CI) pipelines autonomous access through their own key, with very specific definitions of what they are allowed to decrypt.

RELATED ARTICLES

LEARN MORE ABOUT FIFTY2 News

How to get started with
Preonlab CFD software?
Get in Touch